Build a Blog in 15 Minutes
This will start from nothing and show you the main features of Brut by building a very basic blog. You'll learn how to make a new Brut app, how to build pages, submit forms, validate data, and access data in a database. You'll also learn how to test it all.
Set Up
The only two pieces of software you need are Docker and a code editor:
TIP
If you are on Windows, we highly recommend you use the Windows Subystem for Linux (WSL2), as this makes Brut, web developement, and, honestly, your entire life as you know it, far easier than trying to get things working natively in Windows.
If you are new to programming or new to Ruby and don't know what editor to get, use VSCode. If you are a vim or emacs person, those will be far better, but if you are used to an IDE, VSCode will be the easiest to get set up and learn to use.
To check that docker is installed, open up a terminal and run:
docker infoThis should produce a ton of output:
# OUTPUT
Client:
 Version:    28.2.2
«LOTS OF OUTPUT»
To be extra sure, right after you ran docker info, check $?, the exit code, to make sure it's a 0, which means the command ran successfully:
echo $?# OUTPUT
0Now, let's create the app by first initializing it.
Initialize Your App
brut is a command line app that will initialize your new app. It's available as a RubyGem or a Docker image. We'll use the Docker image since that doesn't require installing anything.
We'll call the blog simply "blog". brut new will insert some demo features in new apps to show you have to use Brut. Since you're following this tutorial, you don't need that, so we'll use the --no-demo flag.
cd to a folder where you'd like to work. brut new will create a folder called blog in there and in that folder, your app will be initialized.
The command to do this is pretty long, because it downloads brut new and then runs it inside a Docker container, meaning you don't have to install anything new. Here it is:
docker run \
       --pull always \
       -v "$PWD":"$PWD" \
       -w "$PWD" \
       -u $(id -u):$(id -g) \
       -it \
       thirdtank/brut \
       brut new --no-demo blog
You should see this output:
# OUTPUT
[ brut ] Creating app with these options:
[ brut ] App name:      blog
[ brut ] App ID:        blog
[ brut ] Prefix:        bl
[ brut ] Organization:  blog
[ brut ] Include demo?  false
[ brut ] Creating Base app
[ brut ] Creating segment: Bare bones framing
[ brut ] blog was created

[ brut ] Time to get building:
[ brut ] 1. cd blog
[ brut ] 2. dx/build
[ brut ] 3. dx/start
[ brut ] 4. [ in another terminal ] dx/exec bash
[ brut ] 5. [ inside the Docker container ] bin/setup
[ brut ] 6. [ inside the Docker container ] bin/dev
[ brut ] 7. Visit http://localhost:6502 in your browser
[ brut ] 8. [ inside the Docker container ] bin/setup help # to see more commands
Before we follow the instructions in the output, cd to blog and check it out.
cd blog
ls
#OUTPUT
app Dockerfile.dx Procfile.development specs
bin dx Procfile.test
config.ru Gemfile puma.config.rb
docker-compose.dx.yml package.json README.mdappis where all the code your app will bebinhas command line tools to manage your appdxhas command line tools to manage your development environmentspecsis where your tests will go
OK, let's start up the dev environment:
dx/build# OUTPUT
[ dx/build ] Could not find Gemfile.lock, which is needed to determine the playwright-ruby-client version
[ dx/build ] Assuming your app is brand-new, this should be OK
[+] Building 0.2s
«LOTS OF OUTPUT»This may take a while, but it's building a Docker image where all your work will happen, although you'll be able to edit your code on your computer with the editor of your choice.
When this is done, you should see a message like so:
# OUTPUT
[ dx/build ] 🌈 Your Docker image has been built tagged 'blog/blog:ruby-3.4'
[ dx/build ] 🔄 You can now run dx/start to start it up, though you may need to stop it first with Ctrl-C
Now, start up the environment:
dx/start#OUTPUT
[ dx/start ] 🚀 Starting docker-compose.dx.yml
[+] Running 1/5
⠙ Container blog-postgres-1
⠙ Container blog-app-1
⠙ Container blog-otel-desktop-viewer-1
«LOTS OF OUTPUT»
app-1 | 2025-08-11T16:39:11.568390000-04:00
app-1 | 2025-08-11T16:39:11.568978000-04:00
app-1 | 2025-08-11T16:39:11.569430000-04:00
app-1 | 2025-08-11T16:39:11.569825000-04:00 🎉 Dev Environment Initialized! 🎉
app-1 | 2025-08-11T16:39:11.570214000-04:00
app-1 | 2025-08-11T16:39:11.570599000-04:00 ℹ️ To use this environment, open a new terminal and run
app-1 | 2025-08-11T16:39:11.570980000-04:00
app-1 | 2025-08-11T16:39:11.571250000-04:00 dx/exec bash
app-1 | 2025-08-11T16:39:11.571521000-04:00
app-1 | 2025-08-11T16:39:11.571795000-04:00 🕹 Use `ctrl-c` to exit.
app-1 | 2025-08-11T16:39:11.572064000-04:00
app-1 | 2025-08-11T16:39:11.572327000-04:00
app-1 | 2025-08-11T16:39:11.572596000-04:00dx/start will keep running. If you stop it, your dev environment will stop. It's running three containers:
app, which is where the app and its test will runpostgres, which is running PostgreSQL, a SQL database you'll useotel-desktop-viewerwhich can view telemetry of your app. We'll see that later.
Now, let's access the container we started.
Open a new terminal window, cd to where blog is, and use dx/exec to run bash, effectively "logging in" to the container:
dx/exec bash# OUTPUT
[ dx/exec ] 🚂 Running 'ssh-agent bash' inside container with service name 'app'
Now using node v22.18.0 (npm v10.9.3)
docker-container - Projects/blog
>At that prompt, you can now type commands. If you type ls, you'll see the same files you saw when we ran it above:
ls#OUTPUT
app Dockerfile.dx Procfile.development specs
bin dx Procfile.test
config.ru Gemfile puma.config.rb
docker-compose.dx.yml package.json README.mdThis is because the folder on your computer is synced to the one inside the container. Changes in one are immediately reflected in the other.
From here on out, all command line invocations are run inside this container, unless stated otherwise.
Set Up the App Itself
brut new created a lot of files for you, as well as command line apps to manage your app. We're going to perform app setup via bin/setup. This completely automates the following tasks:
- Installing RubyGems
- Installing Node Modules
- Installing Shopfiy's Ruby LSP, and Microsoft's JS and CSS LSPs
- Creating your dev and test databases
- Setting up Chromium, which we'll use to run end-to-end tests
Run it now (remember, this is inside the container, so you should've run dx/exec bash on your computer first)
bin/setup# OUTPUT
[ bin/setup ] Installing gems
[ bin/setup ] Executing ["bundle check --no-color || bundle install --no-color --quiet"]
«LOTS OF OUTPUT»
[ bin/setup ] All set up.
USEFUL COMMANDS
bin/dev
# run app locally, rebuilding and reloading as needed
bin/ci
# runs all tests and checks as CI would
bin/console
# get an IRB console with the app loaded
brut db
# interact with the DB for migrations, information, etc
brut dbconsole
# get a PSQL session to the database
brut scaffold
# Create various structures in your app, like pages or forms
bin/setup help
# show this helpWhen this is done, we can check that everything's working by running bin/ci. bin/ci runs all tests and quality checks. Even though you haven't written any code, there's just a bit included to ensure that what little is there is working properly. It's a good check before you start to make sure install and setup worked.
bin/ci# OUTPUT
[ bin/ci ] Building Assets
«LOTS OF OUTPUT»
[ bin/ci ] Running non E2E tests
«LOTS OF OUTPUT»
[ bin/ci ] Running JS tests
«LOTS OF OUTPUT»
[ bin/ci ] Running E2E tests
«LOTS OF OUTPUT»
[ bin/ci ] Analyzing Ruby gems for
«LOTS OF OUTPUT»
[ bin/ci ] security vulnerabilities
«LOTS OF OUTPUT»
[ bin/ci ] Checking to see that all classes have tests
«LOTS OF OUTPUT»
[ bin/ci ] DoneFinally, we'll run the app itself via bin/dev
bin/devbin/dev won't exit, it'll sit there running your app until you hit Ctrl-C. Amongst the output you should see a message like:
# OUTPUT
« LOTS OF OUTPUT »
20:43:41 startup_message.1 | Your app is now running at
20:43:41 startup_message.1 |
20:43:41 startup_message.1 |   http://localhost:6502
20:43:41 startup_message.1 |
Go to http://localhost:6502 in your web browser. You should see a welcome screen like so:
The Blog We'll Build
We're ready to write some code! Here's how the blog is going to work:
- A blog post has a title and content, with each paragraph of the content separated with
\n\r, which is what the browser inserts when you hit return. - The home page will show all the blog posts in reverse chronological order.
- The home page will link to the edit blog post page where a blog post can be created.
- Blog posts will be submitted to the backend to be saved, with the following constraints:
- title and content are required
- title must be at least three characters
- content must be at least 5 words (i.e. space-separated tokens)
We'll discuss tests later. To make it easier to follow Brut, we'll get things working first and then test them. You can absolutely do TDD with Brut, but we find it's hard to learn new things this way.
Let's start not from the database, but from the user experience.
Building and Styling Pages
The home page of a Brut app is served, naturally, on / and is implemented by the class HomePage, located in app/src/front_end/pages/home_page.rb.
A page in Brut is a Phlex component that is rendered inside a layout. A layout is common markup that all pages should have, such as the <head> section and perhaps a <body> or other tags. brut new provided a default layout that's good for now, so we just have to worry about the HTML that is specific to a page.
Open up app/src/front_end/pages/home_page.rb in your editor. You should see something like this:
class HomePage < AppPage
  def page_template
    # The duplication and excessive class sizes here are to
    # make it easier for you to remove this when you start working
    # on your app.  There are pros and cons to how this code
    # is written, so don't take this is as a directive on how to
    # build your app. You do you!
    img(src: "/static/images/LogoPylon.png",
        class: "dn db-ns pos-fixed top-0 left-0 h-100vh w-auto z-2")

    header(class: "flex flex-column items-center justify-center h-100vh") do

      # A lot more code

    end
  end
end
page_template is where you can call Phlex to generate HTML.
NOTE
Phlex components use view_template, and that's what components in Brut use, too. Pages, however, use page_template so that the HTML can be placed inside a layout. page_template is a Brut concept, not a Phlex one.
Creating the HomePage
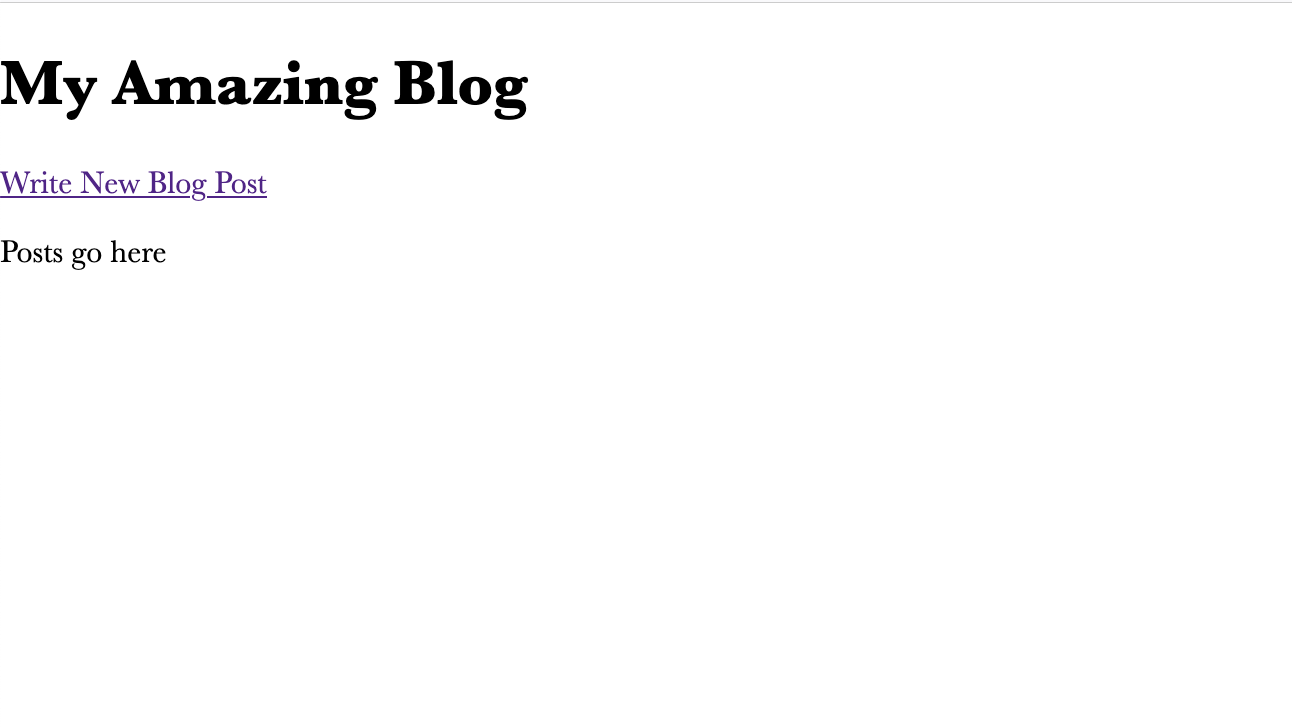
Delete all the code in page_template and replace it with this:
def page_template
  header do
    h1 { "My Amazing Blog" }
    a(href: "") { "Write New Blog Post" }
  end
  main do
    p { "Posts go here" }
  end
end
If you've never used Phlex before, it's a Ruby API that defines one method for each HTML element (along with any custom elements you tell it about). You then call these methods to build up markup. As you can see, it's structurally identical to HTML, but it's Ruby.
If your server is still running, refresh the page and you'll see this wonderful UI (otherwise, start your server with bin/dev):
Let's make it a bit nicer.
Using CSS
Open up app/src/front_end/css/index.css in your editor. You should see this:
@import "brut-css/dist/brut.css";
@import "svgs.css";
Brut uses esbuild to bundle CSS. esbuild makes use of the standard @import directive. All @imports are relative to the current file or to node_modules. brut-css/dist/brut.css is the BrutCSS library that comes with Brut. We aren't going to use it, just to keep things focused. svgs.css is located in app/src/front_end/css/svgs.css and sets up a few classes for inline SVGs.
We'll add some CSS for the home page right here. We'll use vanilla CSS to avoid going on a deep dive on CSS frameworks.
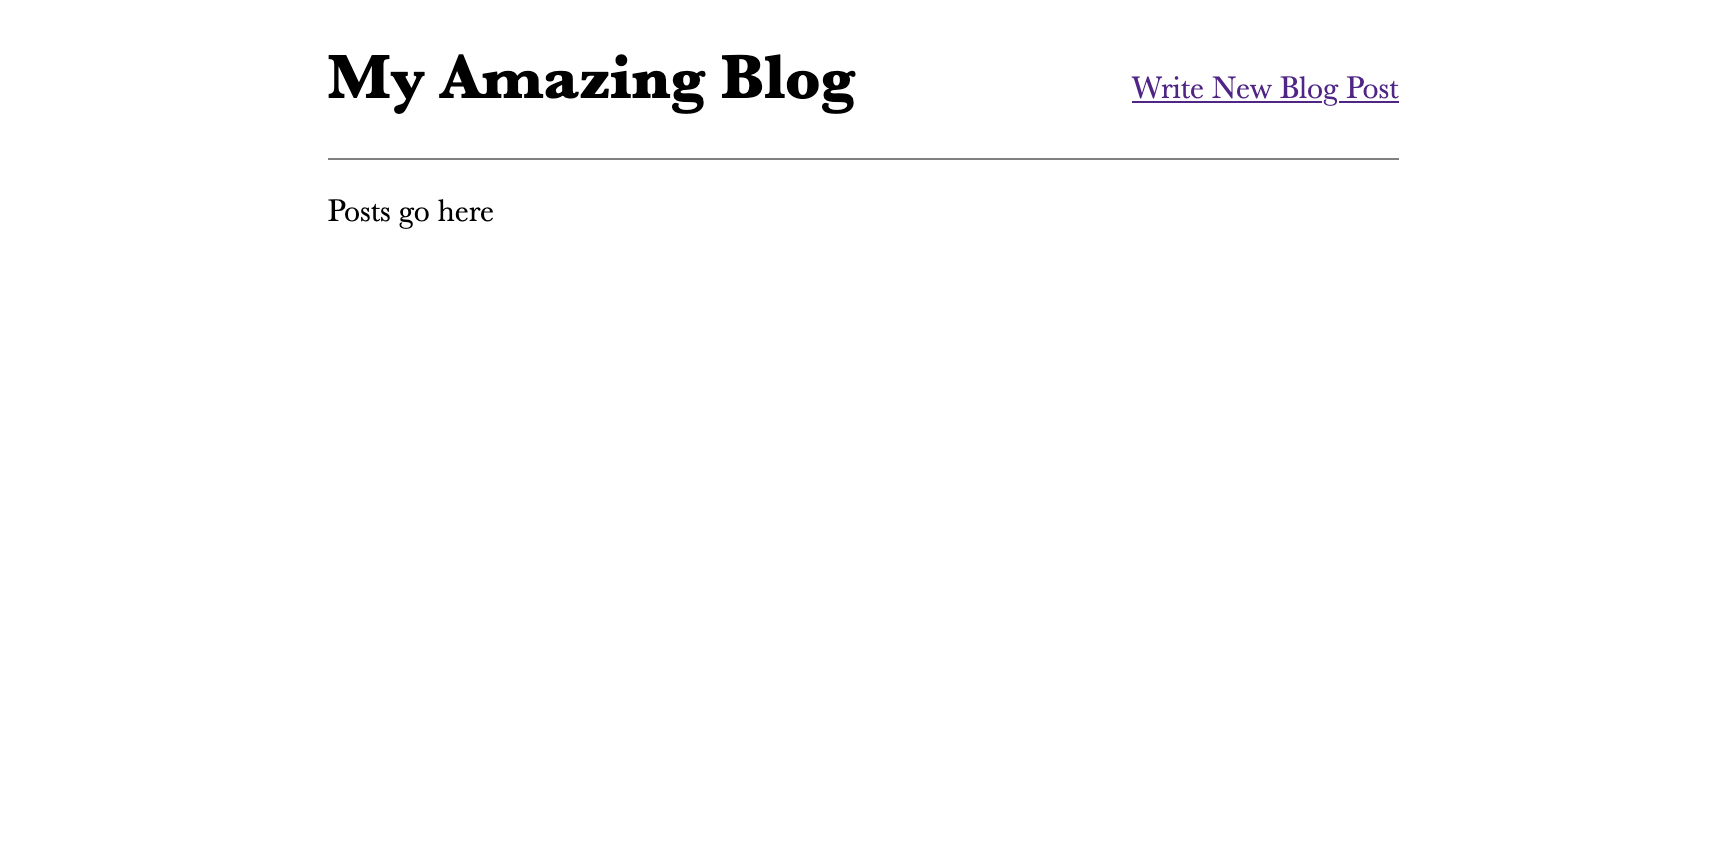
Add this below @import "svgs.css";
body {
  width: 50%;
  margin-left: auto;
  margin-right: auto;
}

header {
  border-bottom: solid thin gray;
  display: flex;
  align-items: baseline;
  justify-content: space-between;
  width: 100%;
  gap: 0.5rem;
}
If you reload the home page in your browser, it now looks at least a little bit respectible:
Now, let's build the blog post editor.
Creating Forms
To create blog posts, we need three things:
- A page where the creation happens, which will host an HTML
<form> - A URL where that
<form>will be submitted - Some code to handle the submissions
Creating a New Page
To make a new page in Brut, we'll need to declare a route, and Brut will choose the class name. We'll use /blog_post_editor, meaning Brut will expect BlogPostEditorPage to exist. We can do all this at once with brut scaffold page. brut scaffold page accepts the URL of the page we want to build. Brut will use that URL to figure out the page class' name and generate it, along with a failing test. It will also insert the route into app.rb. Run it now, like so:
brut scaffold page /blog_post_editorYour output should look like so:
# OUTPUT
[ brut scaffold ] Inserted route into app/src/app.rb
[ brut scaffold ] Page source is in app/src/front_end/pages/blog_post_editor_page.rb
[ brut scaffold ] Page test is in   specs/front_end/pages/blog_post_editor_page.spec.rb
[ brut scaffold ] Added title to    app/config/i18n/en/2_app.rb
[ brut scaffold ] Added route to    app/src/app.rb
Restart your server (Brut currently cannot auto-reload new routes).
If you manually navigate to http://localhost:6502/blog_post_editor, you can see a very basic page has been created. Before we build the actual page, let's change the home page so it links here.
If you'll recall, we had a a(href:"") { ... } in our template. We now know the URL for that href. We could use the actual url, /blog_post_editor, but it's going to be easier to manage our app over time if we don't hard-code paths and instead use our new page class to generate the URL.
Open up app/src/front_end/pages/home_page.rb and make this change:
-     a(href: "") { "Write New Blog Post" }
+     a(href: BlogPostEditorPage.routing) { "Write New Blog Post" }
All page classes have a .routing method. By using this instead of building a URL ourselves, we get some advantages:
- If we rename or remove
BlogPostEditorPage, any page referencing it will generate a nice, easy-to-understand error. routingcan manage query strings and anchors in a safe way, plus it can check that if a page has required routing parameters (e.g. the123in/posts/123), that they are provided.
With this change, you can now click the link and see the BlogPostEditorPage's template we saw earlier.
Most of the BlogPostEditorPage's HTML will be a form to submit a new blog post. While we could write that using HTML, Brut makes life easier by allowing the use of a form class to do it, which also will describe the data to be submitted to the server. This data is handled by a handler.
Create a Form and Handler
A form gets submitted to a URL, and Brut routes that submission to a handler. To create both a form class and a handler, we'll use brut scaffold form, giving it the URL to respond on.
In this case, we'll use the URL /new_blog_post. Stop your server and run this command:
brut scaffold form /new_blog_post# OUTPUT
[ brut scaffold ] NewBlogPostForm in app/src/front_end/forms/new_blog_post_form.rb
[ brut scaffold ] NewBlogPostHandler in app/src/front_end/handlers/new_blog_post_handler.rb
[ brut scaffold ] Spec in specs/front_end/handlers/new_blog_post_handler.spec.rb
[ brut scaffold ] Inserted route into app/src/app.rbWhen creating a new form, the first thing we have to do is edit the form class (in this case, NewBlogPostForm, located in app/src/front_end/forms/new_blog_post_form.rb) to describe the values being accepted by the server.
This can be done by calling static/class methods provided by Brut::FrontEnd::Form, the superclass of AppForm, which is the superclass of our app's forms.
Open up app/src/front_end/forms/new_blog_post_form.rb. We'll call input twice, once for the title and once for the content. input takes keyword arguments that mirror those of the web platform's constraint validation system. Since our title must be at least 3 characters, that means we'll use minlength to specify this.
Here's the code:
class NewBlogPostForm < AppForm
  input :title, minlength: 3
  input :content
end
Each field is required by default (you can set required: false on fields that aren't required).
With these declarations, we can use an instance of this class to generate HTML.
Generating an HTML Form
The BlogPostEditorPage will contain the form used to write a blog post. This page must make sure two things happen:
- When someone navigates to it, it should show the form with nothing in the fields.
- When there is an error in what the blog post author has provided, it should show those errors, but also maintain the inputs the author provided.
To do this, the BlogPostEditorPage will need an instance of NewBlogPostForm. We can create this in its constructor. Open up app/src/front_end/pages/blog_post_editor_page.rb and start it off like so:
class BlogPostEditorPage < AppPage

  def initialize
    @form = NewBlogPostForm.new
  end

  # ...

end
Next, we'll implement page_template and we'll use @form to create HTML for the form's inputs, including client-side constraints and, as we'll see later, pre-existing values from a previous submission.
This will require four parts of Brut's API and use one optional one:
brut_form, a custom element (<brut-form>) that will progressively enhance the form to provide constraint violation visitor experience if JavaScript is enabled.FormTag, a Phlex component provided by Brut that generates the correct<form>element, as well as CSRF protection.Inputs::components, namelyBrut::FrontEnd::Components::Inputs::InputTagandBrut::FrontEnd::Components::Inputs::TextareaTag, which generate<input>and<textarea>, respectively. These Phlex components (provided by Brut) will add the correct attributes for validation, and set the values if the form they are given has values set.Brut::FrontEnd::Components::ConstraintViolations, a Phlex component provided by Brut that generates custom elements that, when JavaScript is enabled, allow for control over the visitor experience when there are constraint violations.- (optional)
tprovides access to localized strings, instead of hard-coding English.
Create page_template to look like so:
def page_template
  h1 { t(:write_new_post) }
  brut_form do
    FormTag(for: @form) do
      label do
        Inputs::InputTag(form: @form,input_name: :title, autofocus: true)
        div { t([:form, :title]) }
        ConstraintViolations(form: @form, input_name: :title)
      end
      label do
        Inputs::TextareaTag(form: @form,input_name: :content, rows: 10)
        div { t([:form, :content] ) }
        ConstraintViolations(form: @form, input_name: :content)
      end

      button { t([:form, :post]) }
    end
  end
end
TIP
You'll notice that we mentioned classes like Brut::FrontEnd::Components::Inputs::InputTag, but the code above is only using Input::InputTag. This is due to Phlex Kits, which allow you to use relative class names in certain circumstances.
Brut makes use of this so there is a clear and organized name for a component, but you almost never have to type or read the entire thing.
Make sure your server is running, then reload the blog post editor page. You should see an error like so:
Translation missing. Options considered were: - en.pages.BlogPostEditorPage.write_new_post - en.write_new_post
Let's add those keys.
Adding Translation Keys
In Brut, translations aren't stored in YAML 🥳🎉, but in a Ruby hash. Brut provides standard translations in app/config/i18n/en/1_defaults.rb, but your app will set its own in app/config/i18n/en/2_app.rb:
# All app-specific translations, or overrides of Brut's defaults, go here.
{
  # en: must be the first entry, thus indicating this is the EN translations
  en: {
    cv: {
      cs: {
      },
      ss: {
        email_taken: "This email has been taken",
      },
    },
    pages: { # Page-specific messages - this key is relied-upon by Brut to exist
      HomePage: {
        title: "Welcome!",
      },
      BlogPostEditorPage: {
        title: "BlogPostEditorPage"
      },
    },
    # ... more code
When you use t on a page in Brut, it looks for pages.«page name».«key», so Brut needs from our form:
pages.BlogPostEditorPage.write_new_postpages.BlogPostEditorPage.form.titlepages.BlogPostEditorPage.form.contentpages.BlogPostEditorPage.form.post
Give them values like so:
# All app-specific translations, or overrides of Brut's defaults, go here.
{
  # en: must be the first entry, thus indicating this is the EN translations
  en: {
    cv: {
      cs: {
      },
      ss: {
        email_taken: "This email has been taken",
      },
    },
    pages: { # Page-specific messages - this key is relied-upon by Brut to exist
      HomePage: {
        title: "Welcome!",
      },
      BlogPostEditorPage: {
        title: "BlogPostEditorPage",
        write_new_post: "Write a new post!",
        form: {
          title: "Title",
          content: "Post Content",
          post: "Post It!",
        }
      },
    },
    # ... more code
Now, when you reload the page, it should work:
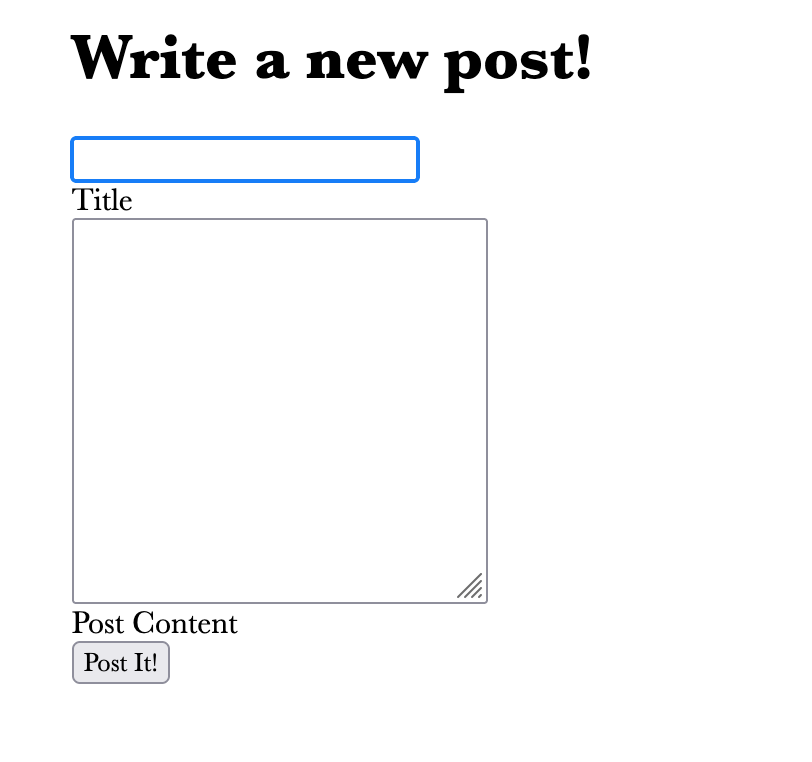
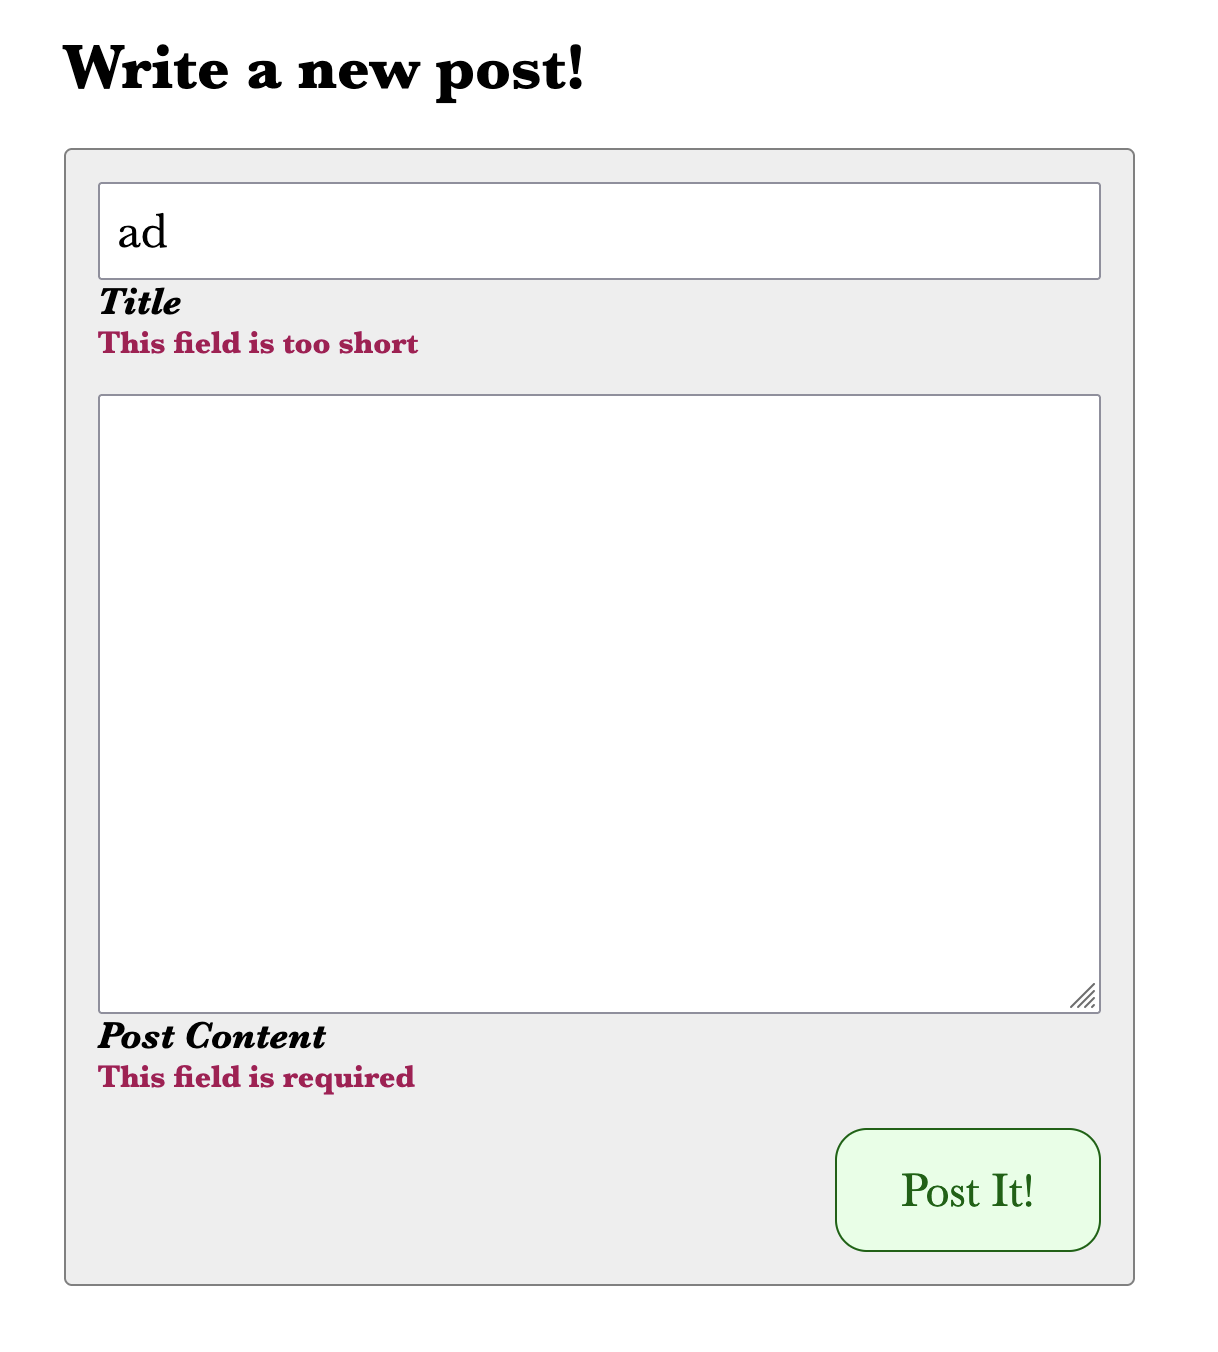
Without filling anything in, click the submit button. The form should show you some error messages that are unstyled:

Let's style them and learn about how the <brut-cv> tags created by ConstraintViolations work.
Styling Constraint Violations
If you view source, you should see HTML like so:
<brut-cv-messages input-name='title'>
</brut-cv-messages>
If you click submit and view source, you'll see something like this:
<brut-cv-messages input-name='title'>
  <brut-cv>This field is required</brut-cv>
</brut-cv-messages>
This was inserted by <brut-form> whenever an element of the form is invalid. This could happen before the visitor clicks "submit", however. To allow you to style these elements only when a submit has been attempted, <brut-form> will set the attribute submitted-invalid on itself when this happens.
Open app/src/front_end/css/index.css in your editor. We want <brut-cv> messages to be red, bold, and in the body font size. We also want them hidden by default.
brut-cv {
  display: none;
  color: #A60053;
  font-weight: bold;
  font-size: 1rem;
}
When submitted-invalid is set on brut-form, then we show them. We also want to show them if they were generated from the server, which ConstraintViolations will do:
brut-form[submitted-invalid] brut-cv,
                             brut-cv[server-side] {
  display: block;
}
Let's also do some styling for the form and its elements. Add this below the CSS you just wrote:
.BlogPostEditorPage {
  brut-form {
    display: block;
    padding: 1rem;
    border: solid thin gray;
    border-radius: 0.25rem;
    background-color: #eeeeee;

    form {
      display: flex;
      flex-direction: column;
      gap: 1rem;
      align-items: start;
    }

    input, textarea {
      width: 100%;
      padding: 0.5rem;
      font-size: 130%;
    }
    label {
      width: 100%;
      font-size: 120%;
      display: block;
      div {
        font-weight: bold;
        font-style: italic;
      }
    }
    button {
      padding-left: 2rem;
      padding-right: 2rem;
      padding-top: 1rem;
      padding-bottom: 1rem;
      background-color: #E5FFE5;
      border: solid thin #006300;
      color: #006300;
      border-radius: 1rem;
      font-size: 150%;
      align-self: end;
      cursor: pointer;
      &:hover {
        background-color: #ACFFAC;
      }
    }
  }
}
Two notes about this CSS:
It's using nesting, which is part of Baseline
We've nested all the CSS inside the
.BlogPostEditorPageclass. The default layout Brut provides includes this:rubybody(class: @page_name) do yield endThis means all pages have their page name set on the
<body>tag, allowing nested CSS, if you like.
Now, if you submit the form without providing any values, you'll see a decent-looking experience:
If you fill out the fields correctly, you should see an error that you need to implement your handler. Let's do that next.
Handling Form Submissions
When you ran brut scaffold form earlier, it created NewBlogPostHandler. It's located in app/src/front_end/handlers/new_blog_post_handler.rb, which should look like so:
class NewBlogPostHandler < AppHandler
  def initialize(form:)
    @form = form
  end

  def handle
    raise "You need to implement your handler"
  end
end
The handle method is expected to return a value that tells Brut how to respond to a form submission. In our case, we'll either want it to re-generate BlogPostEditorPage's HTML with error messages and the visitor-supplied form fields pre-filled in, or save the blog post and redirect back to HomePage.
To do that, we'll either return an instance of BlogPostEditorPage, or return a URI to HomePage (which we can do with the helper method redirect_to).
Before handle is called, NewBlogPostHandler will be initialized and give an instance of NewBlogPostForm containing whatever data was submitted by the browser. handle can then use @form to determine what to do.
First, we'll re-check client-side validations by calling .valid?. If that's true, we can perform server-side validations, calling server_side_constraint_violation for any violations we find. Then, we'll check .valid? again and return a BlogPostEditorPage or redirect.
class NewBlogPostHandler < AppHandler
  def initialize(form:)
    @form = form
  end

  def handle
    if @form.valid?
      if @form.content.split(/\s/).length < 5
        @form.server_side_constraint_violation(
          input_name: :content,
          key: :not_enough_words,
          context: { num_words: 5 }
        )
      end
    end
    if @form.valid?
      # TODO: Actually save the post
      redirect_to(HomePage)
    else
      BlogPostEditorPage.new(form: @form)
    end
  end
end
Of course, BlogPostEditorPage does not accept the form as a parameter. We'll need to change that. Since we are using the @form instance to help generate HTML, if we pass the instance from our handler to the BlogPostEditorPage, when that instance generates HTML, it will have errors indicated and show the visitor's provided values instead of defaults.
Of course, we still need to create a blank form when the page is accessed for the first time, so we'll make form: default to nil and create it if we aren't given a value:
class BlogPostEditorPage < AppPage
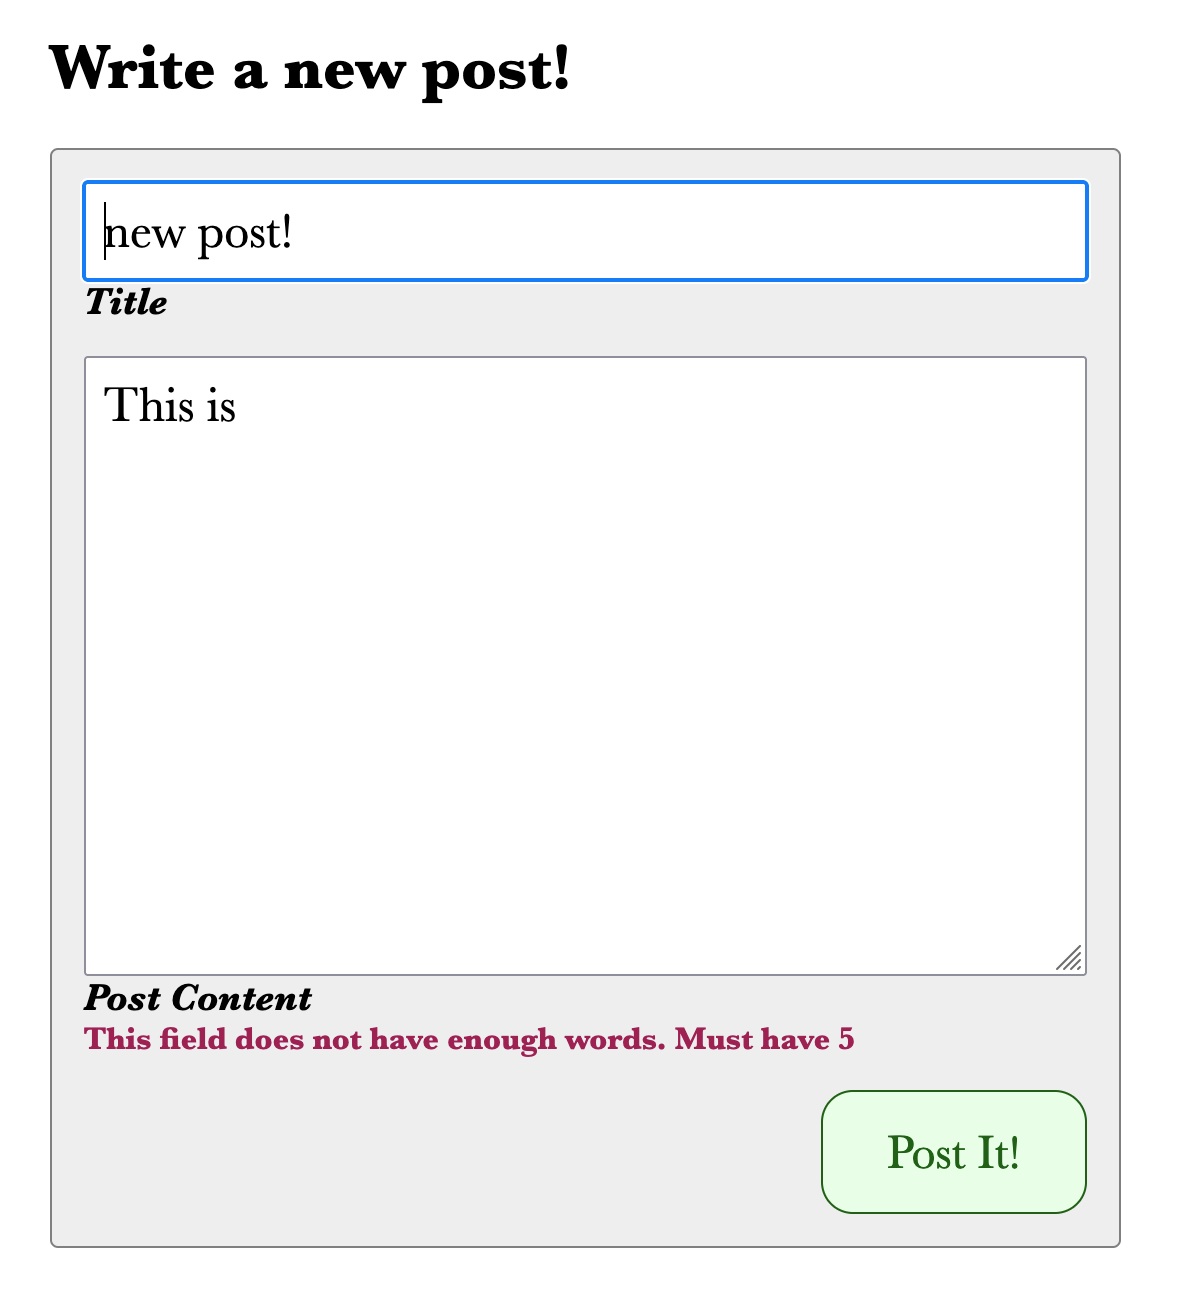
With this in place, create a new blog post but with only four words in the content. This will pass client-side checks, but fail server-side checks. When you submit, you'll see an error related to cv.ss.not_enough_words, which is the key Brut is trying to use to find the actual error message.
Translation missing. Options considered were: - en.components.Brut::FrontEnd::Components::ConstraintViolations.cv.ss.not_enough_words - en.cv.ss.not_enough_words
Add it to app/config/i18n/en/2_app.rb, under en, cv (for constraint violations), ss (for server-side):
# All app-specific translations, or overrides of Brut's defaults, go here.
{
  # en: must be the first entry, thus indicating this is the EN translations
  en: {
    cv: {
      cs: {
      },
      ss: {
        email_taken: "This email has been taken",
        not_enough_words: "%{field} does not have enough words. Must have %{num_words}",
      },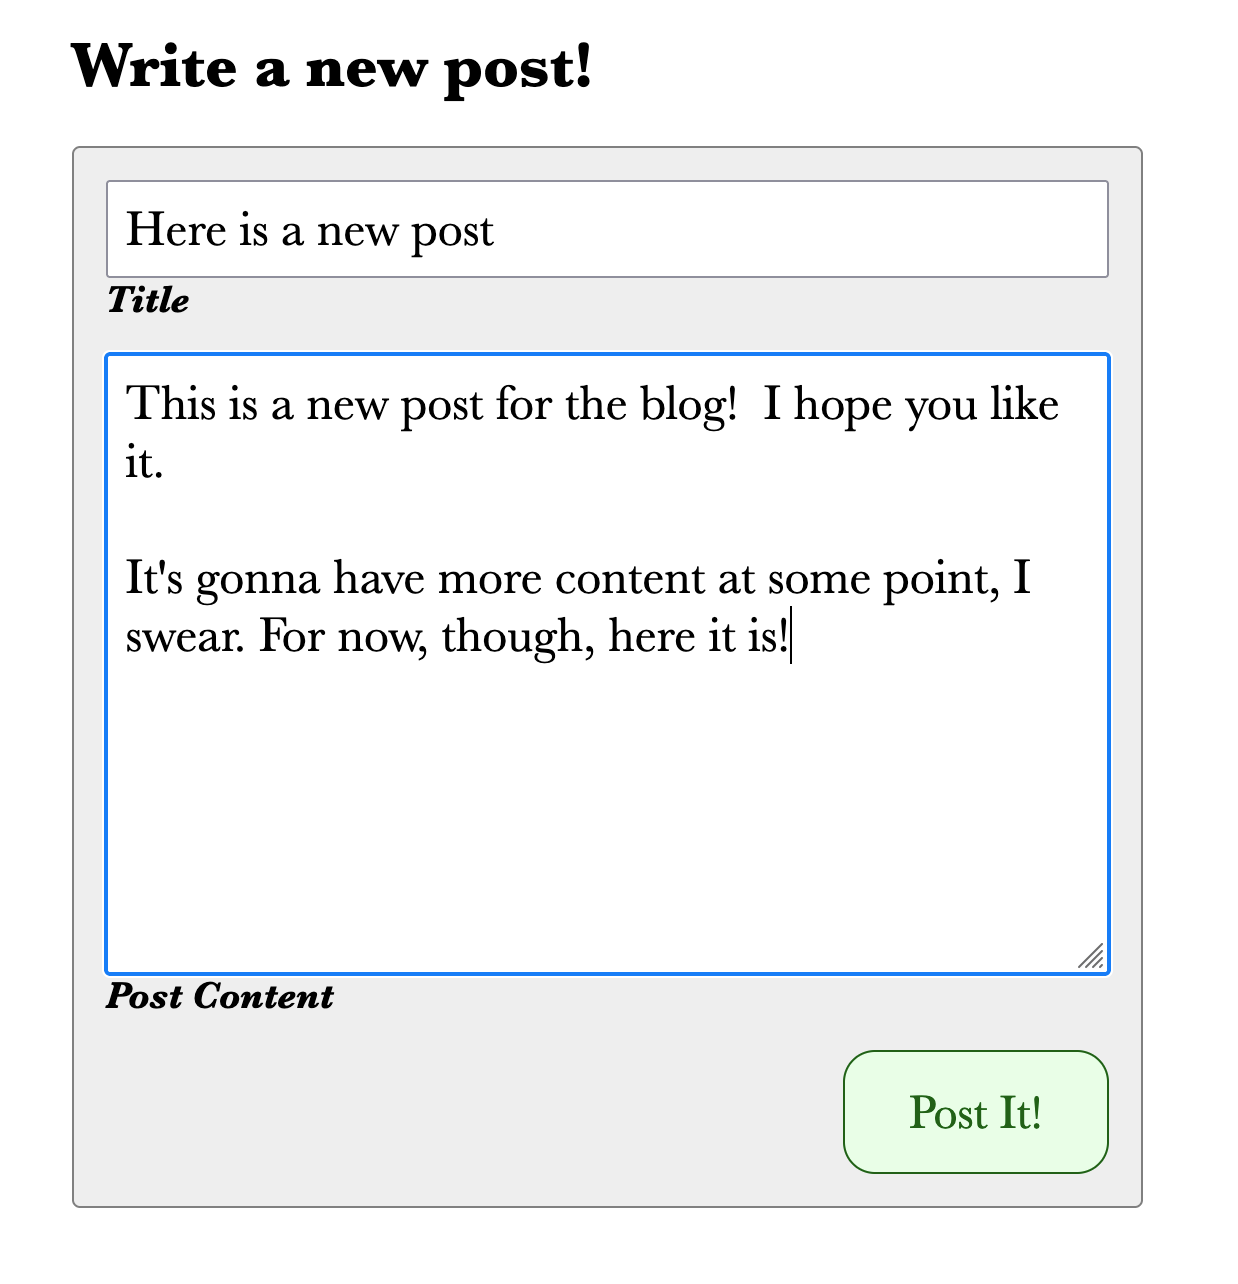
},Now, try again, and you'll see this message, rendered exactly like client-side errors:
Now that we have the user experience in place, let's actually store the blog post in the database.
Using a Database
Brut uses Postgres, and includes and configures the Sequel library to access your data. Sequel has some similarity to Rails' Active Record, but it's not quite the same.
The main way to access data is to create a database model class (which is similar to an Active Record). Sequel also provides a way to manage your database schema via migrations.
The steps to take when creating a new table you want to access are:
- Create a migration that creates the schema for the new table.
- Create the database model class itself.
- Create a FactoryBot factory that can create sample instances of rows in the table, useful for testing and development
- Modify seed data to create sample data for development.
Most of this can be done via brut scaffold db_model.
Creating a New Database Table
Stop your server and run brut scaffold like so:
brut scaffold db_model blog_post# OUTPUT
[ brut scaffold ] Executing ["brut db new_migration create_blog_post"]
[ brut db ] Migration created:
app/src/back_end/data_models/migrations/20250811213758_create_blog_post.rb
[ brut scaffold ] ["brut db new_migration create_blog_post"] succeeded
[ brut scaffold ] Creating DB::BlogPost in app/src/back_end/data_models/db/blog_post.rb
[ brut scaffold ] Creating spec for DB::BlogPost in specs/back_end/data_models/db/blog_post.spec.rb
[ brut scaffold ] Creating factory for DB::BlogPost in specs/factories/db/blog_post.factory.rbYour migration file name will be different than ours, since it has a timestamp embedded into it.
Open that file in your editor and use create_table, as provided by Sequel, to describe the table.
Brut enhances Sequel's create_table in the following ways:
- A numeric primary key called
idis created. comment:is required.external_idcan be given, and will create a managed unique key calledexternal_idthat is safe to externalize and is not used in foreign key or referential integrity.- A timestamped field,
created_atis created and will be set when new rows are created from your app.
Inside create_table, we'll call column to define columns. Brut defaults all columns to NOT NULL, so you don't need to specify null: false.
All of this goes inside a block given to the method up, like so:
Sequel.migration do
  up do
    create_table :blog_posts,
                  comment: "All the posts fit to post",
                  external_id: true do
      column :title, :text
      column :content, :text
    end
  end
end
If you've used migrations before, you may know that down can be used to specify a way to undo the migration, or that a method like change can be used to automatically do both. Brut recommends only using forward migrations inside up. If you need to undo and redo your changes, you can use brut db rebuild to rebuild your database from scratch.
Save this file, then apply this migration to your development database:
brut db migrate# OUTPUT
[ brut db ] Migrations appliedNow, apply it to your test database:
brut db migrate -e test# OUTPUT
[ brut db ] Migrations appliedYou can examine the table that was created by running brut dbconsole:
brut dbconsole# OUTPUT
psql (16.9 (Debian 16.9-1.pgdg120+1), server 16.4 (Debian 16.4-1.pgdg120+2))
Type "help" for help.
blog_development=#This will give you a new prompt where you can type commands to psql, the Postgres command-line client. Try describing the table:
\d blog_posts Table "public.blog_posts"
Column | Type | Collation | Nullable | Default
-------------+--------------------------+-----------+----------+----------------------------------
id | integer | | not null | generated by default as identity
title | text | | not null |
content | text | | not null |
created_at | timestamp with time zone | | not null |
external_id | citext | | not null |
Indexes:
"blog_posts_pkey" PRIMARY KEY, btree (id)
"blog_posts_external_id_key" UNIQUE CONSTRAINT, btree (external_id)brut scaffold created the database model for you in app/src/back_end/data_models/db/blog_post.rb:
class DB::BlogPost < AppDataModel
  has_external_id :bl
end
In Brut, database models are in the DB:: namespace, so you do not conflate them with a domain model.
TIP
Note has_external_id. This tells Brut and Sequel that the underlying table is expected to have the field external_id and that it is expected to be unique. You can see this in the output of \d blog_posts, where it says UNIQUE CONSTRAINT, btree (external_id).
has_external_id configures the database model to provide a value for this key when saving or creating a row. To aid in understanding the values out of context, external ids are prefixed with two values: one is an app-wide value, in our case bl. The other is a model-specific value, also bl. Thus, external ids might look like blbl_9783245789345789345789345.
Before we use this database model, we want to be able to create instances in tests, as well as for local development. The way to do that in Brut is to create a factory.
Creating Test and Development Data
Brut uses FactoryBot to create sample instance of your data. Open up specs/factories/db/blog_post.factory.rb in your editor.
If you are new to FactoryBot, it is a lightweight (ish) DSL that allows creating test data. You'll call methods based on the column names in order to specify values. Brut also includes Faker, which creates randomized but realistic test data.
For the title, we'll use Faker's "hipster ipsum". For the content, we want several paragraphs delineated by \n\r, so we'll create between 2 and 6 paragraphs and join them.
Make specs/factories/db/blog_post.factory.rb look like so:
FactoryBot.define do
  factory :blog_post, class: "DB::BlogPost" do
    title { Faker::Hipster.sentence }
    content {
      (rand(4) + 2).times.map {
       Faker::Hipster.paragraph_by_chars(characters: 200)
      }.join("\n\r")
    }
  end
end
Brut includes a test to make sure your factories are valid and will work. It's in specs/lint_factories.spec.rb. Run it now to make sure this factory works:
TIP
If you stopped your entire dev environment (dx/start), when you restart it, you must re-run bin/setup, since the disk inside your dev environment is ephemeral.
brut test run specs/lint_factories.spec.rb# OUTPUT
[ brut test ] Executing ["bin/rspec -I /Users/davec/Projects/ThirdTank/brutcasts/01-make-a-blog/blog/specs -I /Users/davec/Projects/ThirdTank/brutcasts/01-make-a-blog/blog/app/src -I lib/ --tag ~e2e -P \"**/*.spec.rb\" \"specs/lint_factories.spec.rb\""]
Run options: exclude {e2e: true}
Randomized with seed 29315
factories
should be possible to create them all
Finished in 0.59465 seconds (files took 0.7718 seconds to load)
1 example, 0 failures
Randomized with seed 29315
[ brut test ] ["bin/rspec -I /Users/davec/Projects/ThirdTank/brutcasts/01-make-a-blog/blog/specs -I /Users/davec/Projects/ThirdTank/brutcasts/01-make-a-blog/blog/app/src -I lib/ --tag ~e2e -P \"**/*.spec.rb\" \"specs/lint_factories.spec.rb\""] succeededWe can use this factory for seed data to provide realistic data for development. Edit app/src/back_end/data_models/seed/seed_data.rb, and make it look like so, which will create 10 blog posts:
require "brut/back_end/seed_data"
class SeedData < Brut::BackEnd::SeedData
  include FactoryBot::Syntax::Methods
  def seed!
    10.times do |i|
      create(:blog_post, created_at: Date.today - i)
    end
  end
end
create is a method provided by Factory Bot that is brought in via FactoryBot::Syntax::Methods.
Now, load the seed data into the development database with brut db seed:
brut db seedWe can now show this data on the home page.
Accessing the Database
On HomePage, we put in a <p> as a placeholder for blog posts. Let's replace that with code to fetch and display the blog posts.
In Brut, since HTML is generated by Phlex and thus by Ruby code, we can structure our HTML generation however we like, including by accessing the database directly. This may not scale as our app gets large, but for now, it's the simplest thing to do.
Sequel's database models are similar to Rails' Active Record's in that we can call class methods to access data. In this case, DB::BlogPost has a method order that will fetch all records sorted by the field we give it in the order we decide. The sort field and order is specified via Sequel.desc for descending or Sequel.asc for ascending. We want posts in reverse-chronological order, so Sequel.desc(:created_at) will achieve this.
We can call .each on the result and iterate over each blog post. For the content, we'll split by \n\r to create paragraphs.
Here's what HomePage's page_template should look like now:
def page_template
header do
h1 { "My Amazing Blog" }
a(href: BlogPostEditorPage.routing) { "Write New Blog Post" }
end
main do
DB::BlogPost.order(Sequel.desc(:created_at)).each do |blog_post|
article do
h2 { blog_post.title }
blog_post.content.split(/\n\r/).each do |paragraph|
p { paragraph }
end
end
hr
end
end
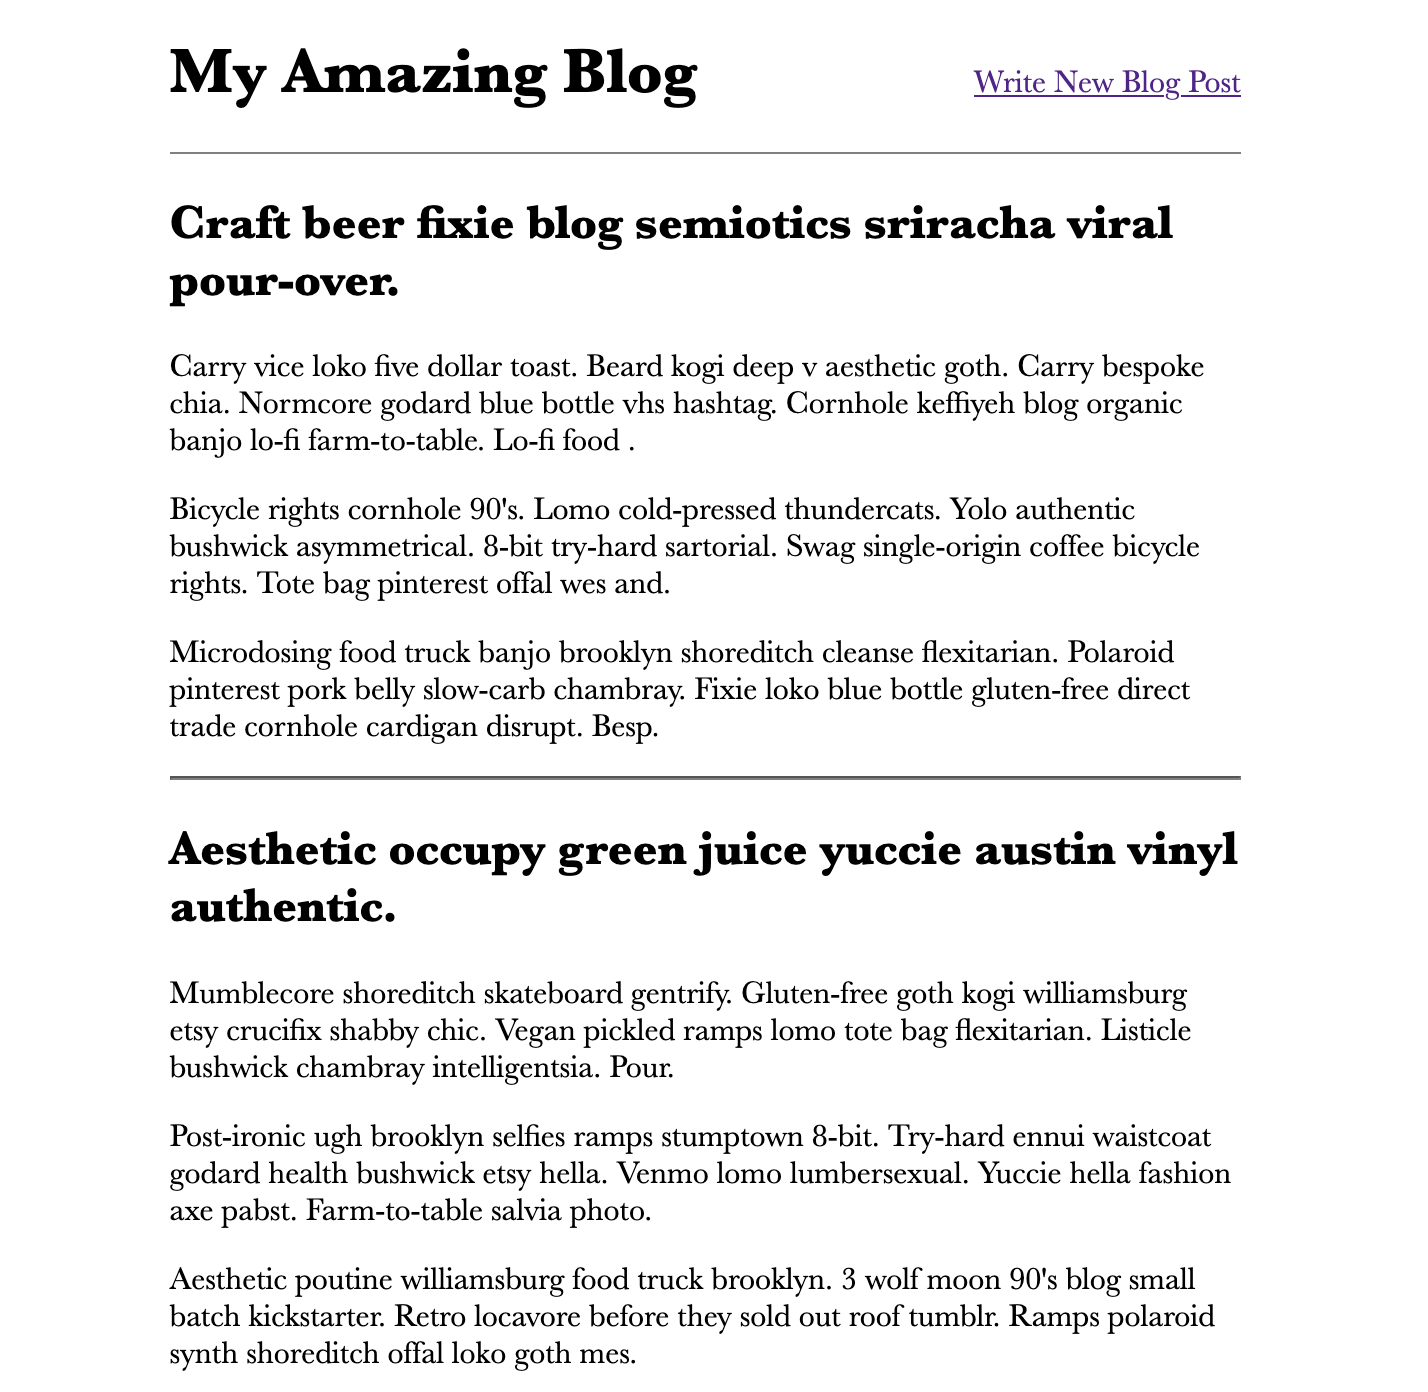
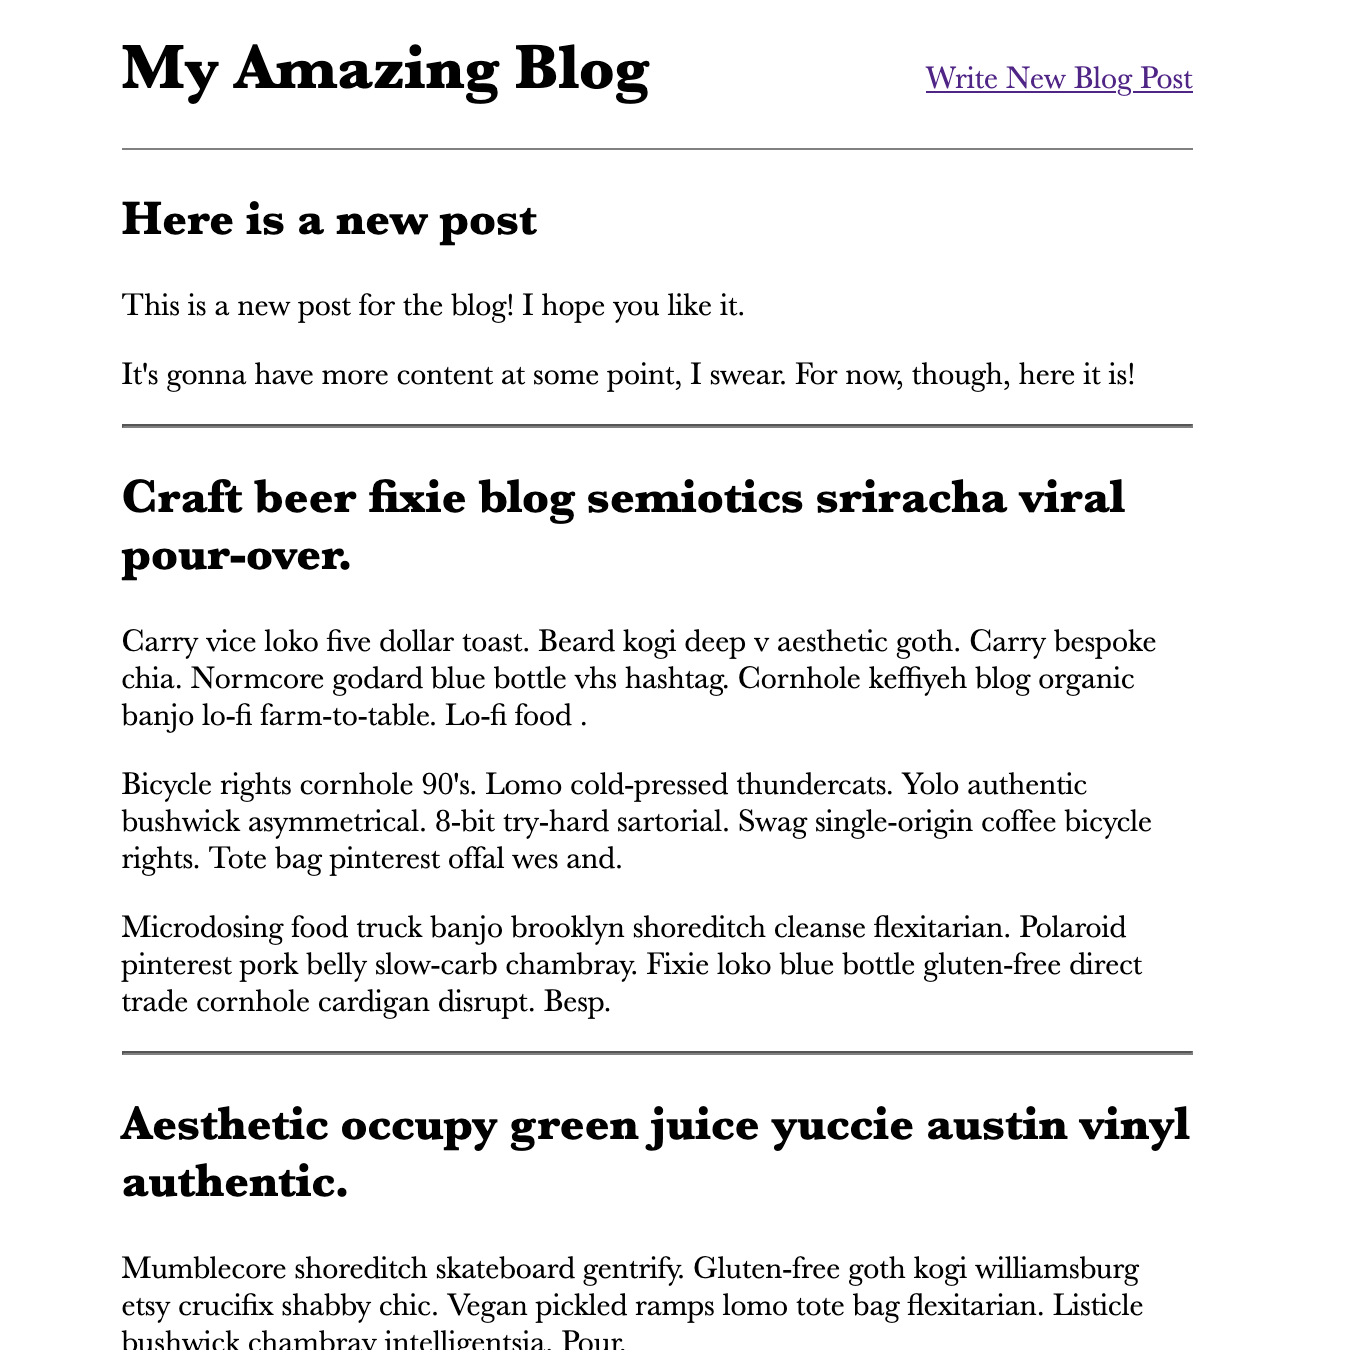
endStart your server if you stopped it before. Go to the home page, and you should see our fake blog posts:
If we modify our handler to save new posts to the database, they'll show up here.
Saving to the Database
To create rows in the database, the class method create can be called on DB::BlogPost. Let's change the handler to use that. Open up app/src/front_end/handlers/new_blog_post_handler.rb and make handle look like so (the changed lines are highlighted):
def handle
  if !@form.constraint_violations?
    if @form.content.split(/\s/).length < 5
      @form.server_side_constraint_violation(
        input_name: :content,
        key: :not_enough_words,
        context: { num_words: 5 }
      )
    end
  end
  if @form.valid?
    DB::BlogPost.create(
      title: @form.title,
      content: @form.content
    )
    redirect_to(HomePage)
  else
    NewBlogPostPage.new(form: @form)
  end
end
The form object provides access to the values of any field we've declared via a method call.
Now, create a new blog post, provide valid data, and submit it.
Once you submit it, you should see the home page with your new post at the top:
Our work isn't quite done. We need tests.
Testing Brut Apps
We'll create the following tests:
- Check that the logic in the handler is sound
- Check that blog posts show up on the home page
- Check that the entire workflow of create a blog post and seeing it show up on the home page works in a real web browser
Let's test our handler first, as that is where the main logic is.
Testing Handlers
Our handler will need three tests:
- If the form was submitted without client-side validations happening, we should not create a new blog post and re-generate the blog post editor page, showing the errors.
- If client-side validations pass, but the blog post isn't five words or more, we should not create a new blog post and re-generate the blog post editor page, showing the errors.
- If everything looks good, we save the new blog post and redirect to the home page.
Brut apps are tested with RSpec, and Brut provides several convenience methods and matchers to make testing as painless as possible.
When testing a handler, the public method is handle!, not handle, so we want to call that (Brut implements handle! to call handle).
First, we'll test client-side validations. Open up specs/front_end/handlers/new_blog_post_handler.spec.rb and replace the code there with this:
require "spec_helper"

RSpec.describe NewBlogPostHandler do
  describe "#handle!" do
    context "client-side violations got to the server" do
      it "re-generates the HTML for the BlogPostEditorPage" do
        form  = NewBlogPostForm.new(params: {})

        result = described_class.new(form:).handle!

        expect(result).to have_generated(BlogPostEditorPage)
        expect(form).to have_constraint_violation(:title, key: :valueMissing)
        expect(form).to have_constraint_violation(:content, key: :valueMissing)
      end
    end
  end
end
have_generated asserts that the value returned from handle! is an instance of the page given, BlogPostEditorPage in this case. You could just as easily write expect(result.kind_of?(BlogPostEditorPage)).to eq(true), but have_generated expressed the intent of what's happening.
have_constraint_violation checks that the form's constraint_violations contains one for the given field and the given key. In this case, we check both :title and :content for :valueMissing.
TIP
Client-side constraint violations use the same keys on the server as they do in the browser. In the case of a required field, the browser's ValidityState would set valueMissing to true. So, that's what Brut would do on the server-side, when reflecting client-side constraints.
Next, we'll check that the server-side constraint violations are being checked. Add this just below the context you just added:
context "post is not enough words" do
  it "re-generates the HTML for the BlogPostEditorPage, with server-side errors indicated" do
    form  = NewBlogPostForm.new(params: {
      title: "What a great post",
      content: "Not enough words",
    })

    confidence_check { expect(form.constraint_violations?).to eq(false) }

    result = described_class.new(form:).handle!

    expect(result).to have_generated(BlogPostEditorPage)
    expect(form).to have_constraint_violation(:content, key: :not_enough_words)
  end
end
This test introduces two new concepts:
- To initialize a form with data, you must pass a
Hashto the keyword argumentparams:. If theHashcontains parameters that the form doesn't recognize, they are ignored and discarded. - Although we aren't expecting the form to have client-side constraint violations, if there are any, the test would fail in a confusing way. To manage this, Brut includes the confidence-check gem that allows you to make assertions that are not part of the test. If the confidence check fails, the test output will be obvious that the test could not run due to an assumption being violated.
Lastly, we'll check that everything worked when there aren't any constraint violations. Add this below the context you just added:
context "post is good!" do
  it "saves the post and redirects to the HomePage" do
    form  = NewBlogPostForm.new(params: {
      title: "What a great post",
      content: "This post is the best post that has been written in the history of posts",
    })

    confidence_check { expect(form.constraint_violations?).to eq(false) }

    result = nil
    expect {
      result = described_class.new(form:).handle!
    }.to change { DB::BlogPost.count }.by(1)

    expect(result).to have_redirected_to(HomePage)

    blog_post = DB::BlogPost.last
    expect(blog_post.title).to   eq("What a great post")
    expect(blog_post.content).to eq("This post is the best post that has been written in the history of posts")

  end
end
This is using RSpec's expect { ... }.to change { ... }.by(N) to make sure that our handler created a row in the database. We then use the matcher have_redirected_to to assert that result is a URI to HomePage. We also check that the blog post we created in the database is correct.
Let's run the test with brut test run
TIP
If you stopped your entire dev environment (dx/start), when you restart it, you must re-run bin/setup, since the disk inside your dev environment is ephemeral.
brut test run specs/front_end/handlers/new_blog_post_handler.spec.rb# OUTPUT
[ brut test ] Executing ["bin/rspec -I /Users/davec/Projects/ThirdTank/brutcasts/01-make-a-blog/blog/specs -I /Users/davec/Projects/ThirdTank/brutcasts/01-make-a-blog/blog/app/src -I lib/ --tag ~e2e -P \"**/*.spec.rb\" \"specs/front_end/handlers/new_blog_post_handler.spec.rb\""]
Run options: exclude {e2e: true}
Randomized with seed 61034
NewBlogPostHandler
post is not enough words
re-generates the HTML for the BlogPostEditorPage, with server-side errors indicated
post is good!
saves the post and redirects to the HomePage
#handle!
client-side violations got to the server
re-generates the HTML for the BlogPostEditorPage
Finished in 0.0138 seconds (files took 0.73976 seconds to load)
3 examples, 0 failures
Randomized with seed 61034
[ brut test ] ["bin/rspec -I /Users/davec/Projects/ThirdTank/brutcasts/01-make-a-blog/blog/specs -I /Users/davec/Projects/ThirdTank/brutcasts/01-make-a-blog/blog/app/src -I lib/ --tag ~e2e -P \"**/*.spec.rb\" \"specs/front_end/handlers/new_blog_post_handler.spec.rb\""] succeededIt passes!
Next, let's test HomePage.
Testing Pages
Unlike our handler, which accepts arguments and returns a result, pages generate HTML. We are better off testing pages by asking them to generate HTML and then examining the HTML directly.
Brut provides the method generate_and_parse to generate a page's HTML, then use Nokogiri to parse it. We can use CSS selectors on the result to assert things about the HTML.
brut new created specs/front_end/pages/home_page.spec.rb, so let's open that up on your editor.
The way we'll write this test is to generate four random blog posts using our factory, request the page, then assert that each blog post is on the page.
Rather than assert that each blog post's text is just somewhere on the page, we'll make use of the external_id concept. We'll use it as the id attribute of the <article>.
Brut intends for you to use Nokogiri's API to access information about the parsed document, however it provides a few convenience methods. In the test below, you'll see e!, which is added to Nokogiri nodes.
e! asserts that exactly one node matches the given CSS selector and returns that node. This makes it more expedient to access something that should be there, but fail with a useful error message when it's not.
Here's the test:
require "spec_helper"

RSpec.describe HomePage do
  it "should show the blog posts" do

    blog_posts = 4.times.map { create(:blog_post) }

    result = generate_and_parse(described_class.new)

    expect(result.e!("h1").text).to eq("My Amazing Blog")

    blog_posts.each do |blog_post|
      post_article = result.e!("article##{blog_post.external_id}")
      expect(post_article.e!("h2").text).to eq(blog_post.title)
      blog_post.content.split(/\n\r/).each do |paragraph|
        expect(post_article.text).to include(paragraph)
      end
    end
  end
end
Let's run the test, which should fail:
TIP
If you stopped your entire dev environment (dx/start), when you restart it, you must re-run bin/setup, since the disk inside your dev environment is ephemeral.
brut test run specs/front_end/pages/home_page.spec.rb# OUTPUT
[ brut test ] Executing ["bin/rspec -I /Users/davec/Projects/ThirdTank/brutcasts/01-make-a-blog/blog/specs -I /Users/davec/Projects/ThirdTank/brutcasts/01-make-a-blog/blog/app/src -I lib/ --tag ~e2e -P \"**/*.spec.rb\" \"specs/front_end/pages/home_page.spec.rb\""]
Run options: exclude {e2e: true}
Randomized with seed 44491
HomePage
should show the blog posts (FAILED - 1)
Failures:
1) HomePage should show the blog posts
Failure/Error: post_article = result.e!("article##{blog_post.external_id}")
article#blbl_6f04feaefb9520d86b19c3ac4ad22c4f matched 0 elements, not exactly 1:
«HUGE HTML DOCUMENT»
# ./local-gems/gem-home/gems/brut-0.5.0/lib/brut/spec_support/enhanced_node.rb:32:in 'Brut::SpecSupport::EnhancedNode#e!'
# ./specs/front_end/pages/home_page.spec.rb:13:in 'block (3 levels) in <top (required)>'
# ./specs/front_end/pages/home_page.spec.rb:12:in 'Array#each'
# ./specs/front_end/pages/home_page.spec.rb:12:in 'block (2 levels) in <top (required)>'
# ./local-gems/gem-home/gems/brut-0.5.0/lib/brut/spec_support/rspec_setup.rb:158:in 'block (2 levels) in Brut::SpecSupport::RSpecSetup#setup!'
# ./local-gems/gem-home/gems/sequel-5.95.1/lib/sequel/database/transactions.rb:264:in 'Sequel::Database#_transaction'
# ./local-gems/gem-home/gems/sequel-5.95.1/lib/sequel/database/transactions.rb:239:in 'block in Sequel::Database#transaction'
# ./local-gems/gem-home/gems/sequel-5.95.1/lib/sequel/connection_pool/timed_queue.rb:90:in 'Sequel::TimedQueueConnectionPool#hold'
# ./local-gems/gem-home/gems/sequel-5.95.1/lib/sequel/database/connecting.rb:283:in 'Sequel::Database#synchronize'
# ./local-gems/gem-home/gems/sequel-5.95.1/lib/sequel/database/transactions.rb:197:in 'Sequel::Database#transaction'
# ./local-gems/gem-home/gems/brut-0.5.0/lib/brut/spec_support/rspec_setup.rb:156:in 'block in Brut::SpecSupport::RSpecSetup#setup!'
Finished in 0.54876 seconds (files took 0.73025 seconds to load)
1 example, 1 failure
Failed examples:
brut test run ./specs/front_end/pages/home_page.spec.rb:4 # HomePage should show the blog posts
Randomized with seed 44491
[ brut test ] error: ["bin/rspec -I /Users/davec/Projects/ThirdTank/brutcasts/01-make-a-blog/blog/specs -I /Users/davec/Projects/ThirdTank/brutcasts/01-make-a-blog/blog/app/src -I lib/ --tag ~e2e -P \"**/*.spec.rb\" \"specs/front_end/pages/home_page.spec.rb\""] failed - exited 1Brut obviously errs on the side of being verbose. But, you can see that the problem is that it cannot find an <article> with the id= of blbl_6f04feaefb9520d86b19c3ac4ad22c4f, the external_id of the first blog post.
To make it pass, we'll need to add id: to each <article>. Make this one-line change in HomePage:
-      article do
+      article(id: blog_post.external_id) do
TIP
This shows a useful feature of the external_id: Because it's not only unique to the database table, but also across all database tables, it makes a pretty good ID inside an HTML page, since it's highly unlikely any other part of the page would use that value for the id= of an element.
Now, the test should pass:
TIP
If you stopped your entire dev environment (dx/start), when you restart it, you must re-run brut setup, since the disk inside your dev environment is ephemeral.
brut test run specs/front_end/pages/home_page.spec.rb# OUTPUT
[ brut test ] Executing ["bin/rspec -I /Users/davec/Projects/ThirdTank/brutcasts/01-make-a-blog/blog/specs -I /Users/davec/Projects/ThirdTank/brutcasts/01-make-a-blog/blog/app/src -I lib/ --tag ~e2e -P \"**/*.spec.rb\" \"specs/front_end/pages/home_page.spec.rb\""]
Run options: exclude {e2e: true}
Randomized with seed 56951
HomePage
should show the blog posts
Finished in 0.53858 seconds (files took 0.69257 seconds to load)
1 example, 0 failures
Randomized with seed 56951
[ brut test ] ["bin/rspec -I /Users/davec/Projects/ThirdTank/brutcasts/01-make-a-blog/blog/specs -I /Users/davec/Projects/ThirdTank/brutcasts/01-make-a-blog/blog/app/src -I lib/ --tag ~e2e -P \"**/*.spec.rb\" \"specs/front_end/pages/home_page.spec.rb\""] succeededFor BlogPostEditorPage, there really isn't anything to test - it's static HTML at this point. Even still, it's good to record a decision about testing code or not, so it's clear we didn't just forget. Brut provides the method implementation_is_covered_by_other_tests to do just that. It accepts a string where we can describe where the coverage for this class is.
In our case, it's going to be covered by an end-to-end test we'll write next.
Open up specs/front_end/pages/blog_post_editor_page.spec.rb and make it look like so:
require "spec_helper"

RSpec.describe BlogPostEditorPage do
  implementation_is_covered_by_other_tests "end-to-end test"
end
Now, all unit tests should pass, which we can check via brut test run:
TIP
If you stopped your entire dev environment (dx/start), when you restart it, you must re-run bin/setup, since the disk inside your dev environment is ephemeral.
brut test run# OUTPUT
[ brut test ] Running all tests
[ brut test ] Executing ["bin/rspec -I /Users/davec/Projects/ThirdTank/brutcasts/01-make-a-blog/blog/specs -I /Users/davec/Projects/ThirdTank/brutcasts/01-make-a-blog/blog/app/src -I lib/ --tag ~e2e -P \"**/*.spec.rb\" /Users/davec/Projects/ThirdTank/brutcasts/01-make-a-blog/blog/specs/"]
Run options: exclude {e2e: true}
Randomized with seed 63173
...........
Finished in 0.53248 seconds (files took 0.7012 seconds to load)
11 examples, 0 failures
Randomized with seed 63173
[ brut test ] ["bin/rspec -I /Users/davec/Projects/ThirdTank/brutcasts/01-make-a-blog/blog/specs -I /Users/davec/Projects/ThirdTank/brutcasts/01-make-a-blog/blog/app/src -I lib/ --tag ~e2e -P \"**/*.spec.rb\" /Users/davec/Projects/ThirdTank/brutcasts/01-make-a-blog/blog/specs/"] succeededAs our last test, we'll write an end-to-end that uses a browser.
Writing Browser End-to-End Tests
Browser tests are expensive and slow, but it's good to test entire workflows that catch issues that a unit test might not. In this case, we want to go through the steps of writing a blog post:
- Go to the post editor page and make sure client-side validations show us errors.
- Submit a post that's too short and make sure server-side errors show up.
- Submit a valid post and check that it makes it back to the home page.
Brut uses Playwright to author end to end tests. Playwright is written in JavaScript, but there is a Ruby wrapper library that alleviates us from having to worry about async/await style coding.
Ideally, we'd use the same API here as we do in our page tests. Or, equally ideally, we'd be able to use the API of the web platform. Playwright went a third way. Such is life.
The way this test will work is:
- Use
HomePage.routingto kick everything off - Find a link to
BlogPostEditorPage.routingon the page - Use Playwright's
page.locatorto find elements on the page to interact with (which will naturally wait for the page to load before doing so). - We'll use
fillto fill in data for the form fields andclickto submit the form by clicking the submit button. - The matcher
have_textwill be used assert that text appears inside an element.
Brut provides the matcher be_page_for to assert that we are viewing the page we think we are. Nothing is more frustrating than watching assertions fail because your test ended up on the wrong page.
Open up specs/e2e/home_page.spec.rb and replace it with this:
require "spec_helper"

RSpec.describe "Posting blog posts" do
  it "allows posting a post" do

    # 1. Go to the blog post editor page from the home page
    page.goto(HomePage.routing)
    new_post_link = page.locator("a[href='#{BlogPostEditorPage.routing}']")
    new_post_link.click

    expect(page).to be_page_for(BlogPostEditorPage)

    # 2. Provide data that violates client-side constraints and check for error messages
    title_field   = page.locator("brut-form input[name='title']")
    content_field = page.locator("brut-form textarea[name='content']")

    title_field.fill("XX")

    submit_button = page.locator("brut-form button")
    submit_button.click

    expect(page).to be_page_for(BlogPostEditorPage)

    title_error_message   = page.locator("brut-cv-messages[input-name='title'] brut-cv")
    content_error_message = page.locator("brut-cv-messages[input-name='content'] brut-cv")

    expect(title_error_message).to   have_text("This field is too short")
    expect(content_error_message).to have_text("This field is required")

    # 3. Provide data that passes client-side constraints but violates server-side ones
    title_field.fill("New blog post")
    content_field.fill("Too short")

    submit_button.click

    expect(page).to be_page_for(BlogPostEditorPage)

    expect(content_error_message).to have_text("This field does not have enough words")

    # 4. Provide a valid blog post
    content_field.fill("This is a longer post, so we should be OK")

    submit_button.click
    expect(page).to be_page_for(HomePage)

    new_post = DB::BlogPost.order(Sequel.desc(:created_at)).first

    article = page.locator("article##{new_post.external_id}")

    expect(article).to have_text("New blog post")
    expect(article).to have_text("This is a longer post, so we should be OK")

  end
end
Run it now with brut test e2e:
TIP
If you stopped your entire dev environment (dx/start), when you restart it, you must re-run bin/setup, since the disk inside your dev environment is ephemeral.
brut test e2eIt should pass:
# OUTPUT
[ brut test ] Rebuilding test database schema
[ brut test ] Executing ["brut db rebuild --env=test"]
[ brut db ] Database exists. Dropping...
[ brut db ] blog_test does not exit. Creating...
[ brut db ] Migrations applied
[ brut test ] ["brut db rebuild --env=test"] succeeded
[ brut test ] Running all tests
[ brut test ] Executing ["bin/rspec -I /Users/davec/Projects/ThirdTank/brutcasts/01-make-a-blog/blog/specs -I /Users/davec/Projects/ThirdTank/brutcasts/01-make-a-blog/blog/app/src -I lib/ --tag e2e -P \"**/*.spec.rb\" /Users/davec/Projects/ThirdTank/brutcasts/01-make-a-blog/blog/specs/"]
Run options: include {e2e: true}

Randomized with seed 27681
[ brut test-server ] Building assets
«TONS OF OUTPUT»
[ brut test-server ] Starting server
[ bin/run ] No pidfile-Starting up
[3352] Configuration:
«TONS OF OUTPUT»
[3352] Use Ctrl-C to stop
[3352] - Worker 0 (PID: 3361) booted in 0.0s, phase: 0
[3352] - Worker 1 (PID: 3364) booted in 0.0s, phase: 0
.[3352] === puma shutdown: 2025-08-11 22:18:16 +0000 ===
[3352] - Goodbye!
[3352] - Gracefully shutting down workers...


Finished in 3.45 seconds (files took 0.69401 seconds to load)
1 example, 0 failures

Randomized with seed 27681

[ brut test ] ["bin/rspec -I /Users/davec/Projects/ThirdTank/brutcasts/01-make-a-blog/blog/specs -I /Users/davec/Projects/ThirdTank/brutcasts/01-make-a-blog/blog/app/src -I lib/ --tag e2e -P \"**/*.spec.rb\" /Users/davec/Projects/ThirdTank/brutcasts/01-make-a-blog/blog/specs/"] succeeded
[ brut test ] Re-Rebuilding test database schema
[ brut test ] Executing ["brut db rebuild --env=test"]
[ brut db ] Database exists. Dropping...
[ brut db ] blog_test does not exit. Creating...
[ brut db ] Migrations applied
[ brut test ] ["brut db rebuild --env=test"] succeeded
With that test done, bin/ci, which we ran at the start, should run all tests, plus check for CVEs in our installed gems.
bin/ciIt should also pass:
# OUTPUT
«TONS OF OUTPUT»
[ bin/ci ] Analyzing Ruby gems for
[ bin/ci ] security vulnerabilities
Updating ruby-advisory-db ...
From https://github.com/rubysec/ruby-advisory-db
 * branch            master     -> FETCH_HEAD
Already up to date.
Updated ruby-advisory-db
ruby-advisory-db:
  advisories:	998 advisories
  last updated:	2025-08-08 10:26:18 -0700
  commit:	43149b540b701c9683e402fcd7fa4e5b6e5b60e9
No vulnerabilities found
[ bin/ci ] Checking to see that all classes have tests
[ brut test ] All tests exists!
[ bin/ci ] Done
That's it!
Areas for Self-Exploration
Here are a few enhancement you can try to make:
- Create a client-side constraint requiring the title to match a certain regexp.
- Add a server-side constraint requiring at least two paragraphs.
- Allow editing the blog post creation date
- Add an author field to allow entering the author's name
- Add pagination to the home page